N95 | HDR via the N95
High Dynamic Range imaging, better known as HDR, is a great way to make your digital photos look awesome. Normally when you take pictures of subjects with a sky background, the sky will have lots of color and the subject goes dull. Alternatively, you might get a good picture of your subject, but the sky will just be a white mess. With HDR imaging, everything in your picture have more color.
HDR imaging uses multiple pictures with different exposure settings and combines them with Tone Mapping to make awesome pictures. Check out the HDR wikipedia entry here for more info.
Normally, you need a DSLR camera and equipment to pull off such great pictures. I will show you how to pull off such pictures with an N-Series phone.
You need equipment beyond your N-Series phone. Let's start with the tripod. You can get the Nokia Tripod DT-22. It costs about $30 and looks great with the N93 or N95 8GB. Alternatively, you can get a Sunpak Versipod off Amazon for about $15. A great thing about the Sunpak tripod is that you can twist off the head and attach it to a full sized tripod or the very flexible Gorillapod.
The next piece of equipment you will need is a bluetooth keyboard. The key to HDR photos is to keep your camera steady. With a bluetooth keyboard, you can operate the camera menu's without touching your phone, keeping your phone very steady. The Nokia SU-8W or Think Outside Stowaway Keyboard are recommended. Check out the reviews at MobileBurn to help you make a choice.
Now that you have your equipment, let's take some pictures!
1. First set up your N-Series phone with your tripod.
2. Next, activate the camera.
3. Adjust your phone set up your shot on the screen. This should be the last time you touch the phone.
4. Using your keyboard, go into scene modes and select Landscape.
5. Next, go down the menu and set the white balance.
6. Now set the Exposure compensation to +2
7. Go up the menu to Self timer. Set the timer to 10 seconds.
8. Activate the timer.
9. You will now have you first shot. Now press back.
10. Now set the Exposure compensation to 0 and take another picture using the Self timer.
11. Next, take a third picture with the Exposure compensation set to -2.
12. And now you're done. Pack up your stuff and go home.
13. After you have finished taking pictures, upload them to your computer.
The last thing you need for HDR photography is computer software. You can get Adobe Photoshop, but that is really expensive as well as complicated.
I recommend getting Photomatix from HDRsoft. It costs $99 and has a great tutorial on how to make HDR images.
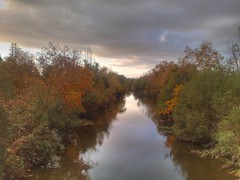
Simply follow the directions and you can get great pictures like mine.
No comments:
Post a Comment
You read this and want to make a comment? Good for you!